Creating high-quality content is a problem most marketers and content creators face. You know that content creation is vital for long-term sustainable growth.
But it’s hard to create content that will resonate with your target audience, rank well on search engines, and won’t take a lot of resources to make.
That’s where the SEMRush Content Marketing Toolkit comes in.
Here’s what you’ll learn in this SEMRush review:
- What is the Content Marketing Toolkit of SEMRush
- How is it different from other SEO tools
- Step-by-Step Tutorial: From Research to Content Creation
In the interest of transparency, this post may contain affiliate links to the tools mentioned. At no additional cost to you, if you click through and decide to purchase, I will earn a commission. Regardless, I only recommend products I use and believe will add value to you.
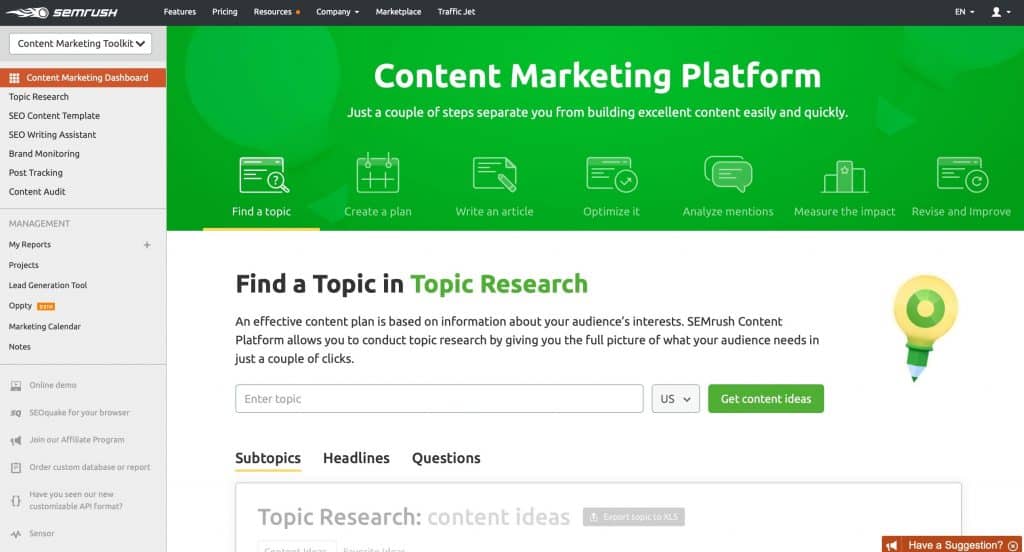
What is the SEMRush Content Marketing Toolkit
The SEMRush Content Marketing Toolkit is a suite of tools designed to help content professionals manage their tasks and create content that resonates with their audience.
This toolkit makes it easy to improve your existing content plan or research, write, and audit new content.
The toolkit contains the following tools/apps:
- Topic Research
- SEO Content Template
- SEO Writing Assistant
- Brand Monitoring
- Post Tracking
- Content Audit
- Marketing Calendar
In other words, the Content Marketing Toolkit covers both ends of content marketing: existing content and new content.
This guide will focus on creating new content and cover these tools: (click on these links to jump to that section)
I’ll cover them briefly here and highlight important parts. But if you’re knowledgeable about them already, you can skip to the next section.
SEMRush offers various tools for digital marketers. This guide is focused on their content marketing toolkit. They also have SEO tools which include site audit, keyword research, and other search engine optimization must-haves.
I’ll create another guide in the future about auditing your existing content in the future and how to use the other tools.
Topic Research Tool: How to Quickly Generate Ideas for Your Content
Digital marketing is complex. It involves a lot of moving parts. But regardless of industry or channel you use—whether that’s through social media, your website, search engines, paid advertisements—content plays a big role.
That’s why your marketing strategy has to put content at its center. After all, what will you promote and communicate if you don’t have any content?
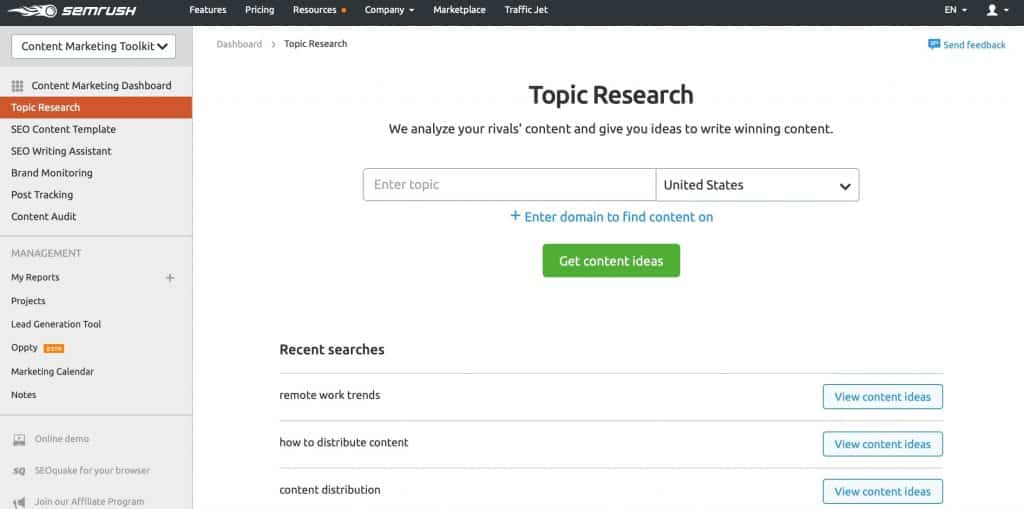
The Topic Research tool helps you generate new ideas and/or headlines for your posts. Just enter a keyword or topic you’d like to write about and wait for it to finish doing its magic.
It will provide you with a list of subtopics and most-shared headlines around it. You can use this to find as many subtopics you could include in your own blog posts.
Why? Because the most effective way to rank on Google this 2020 is creating content that is in-depth—you cover the topic in full, rather than shallowly using a bunch of words to pass as your article.
Long-form outranks short-form content.
Period.

Here’s how to get started
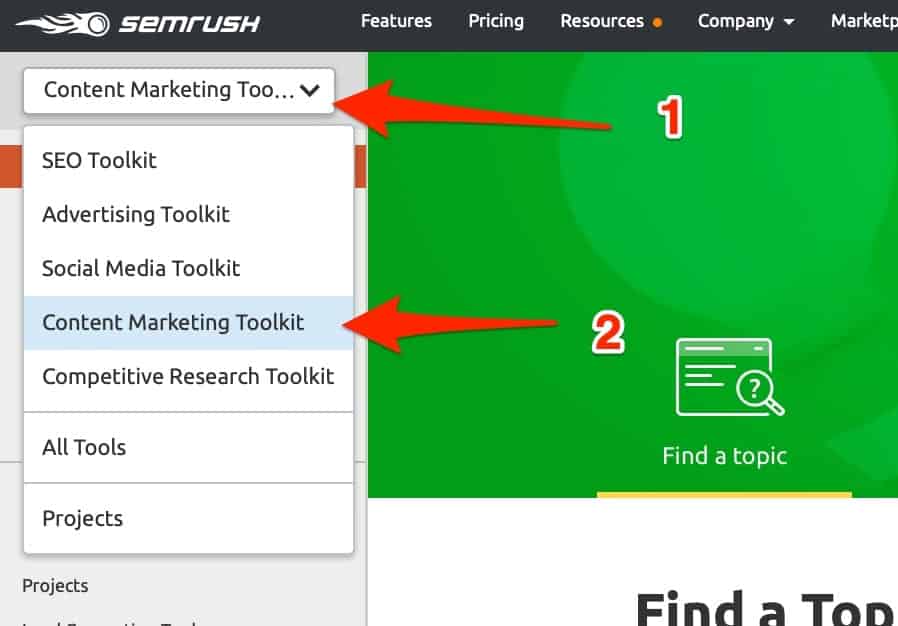
- Make sure you are in the Content Marketing Toolkit area in your SEMRush account
- Click on Topic Research
- Enter your keyword/topic
After entering your topic, the Topic Research tool will show you results and display the subtopics in “cards.” Think of this as Post-it notes.
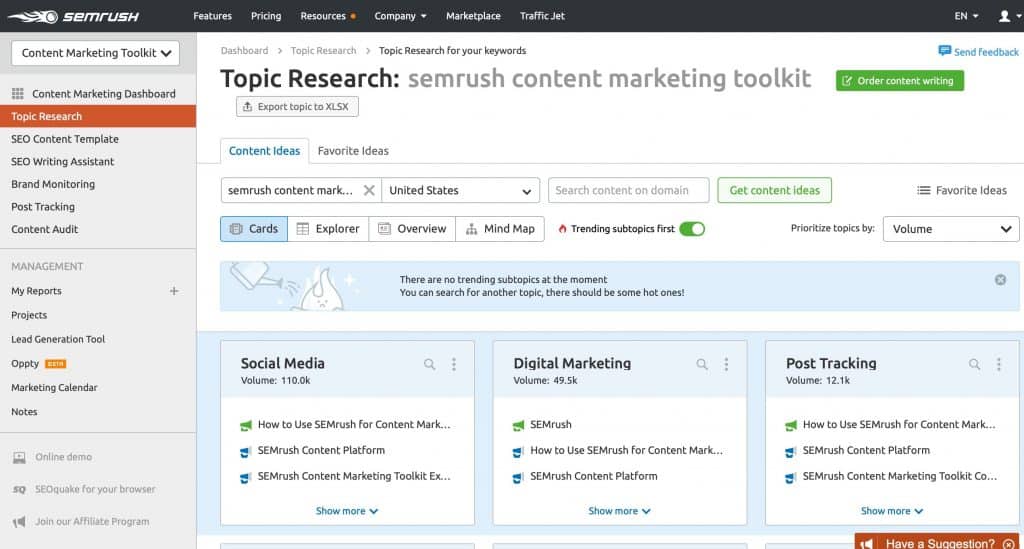
There’s a lot going on here, but I’d like to highlight 3 things:
1. Different views
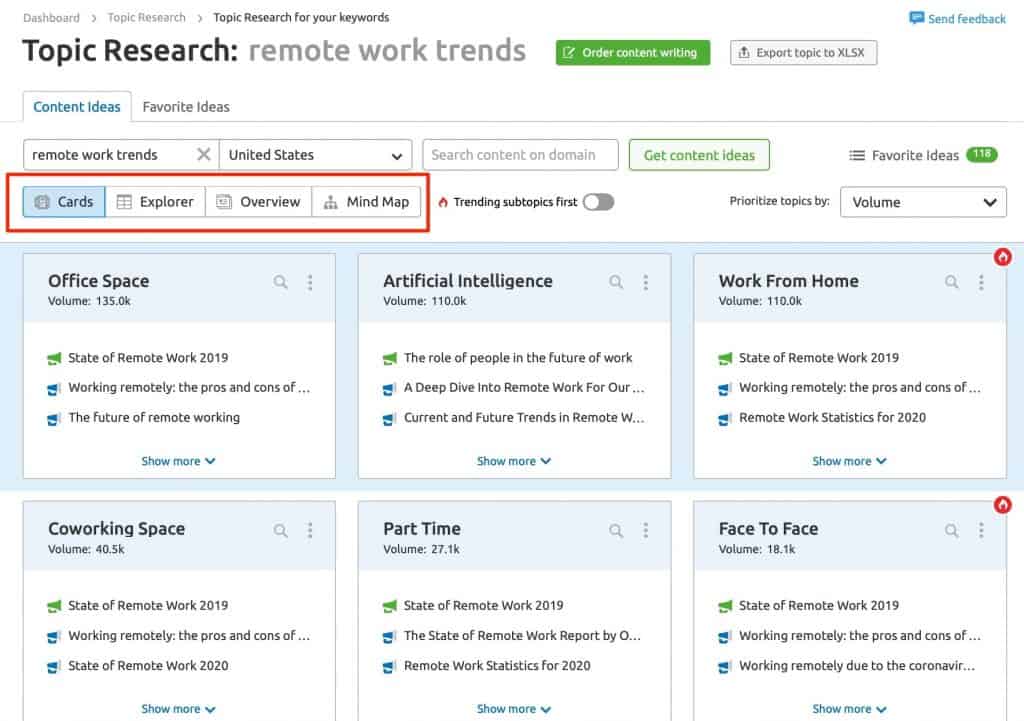
You can view the results in four ways: Cards, Explorer, Overview, Mind Map. The default view is the Cards view.
- The cards view shows you results in a Post-it style. Kind of like brainstorming on a whiteboard.
- The explorer view shows you a table that displays the social traffic/engagement of each subtopic
- As the name suggests, the overview summarizes the top/best results so you don’t can make quick decisions
- You can use the mind map to show you how each subtopic connects with the main one visually
2. Sort/prioritize topics
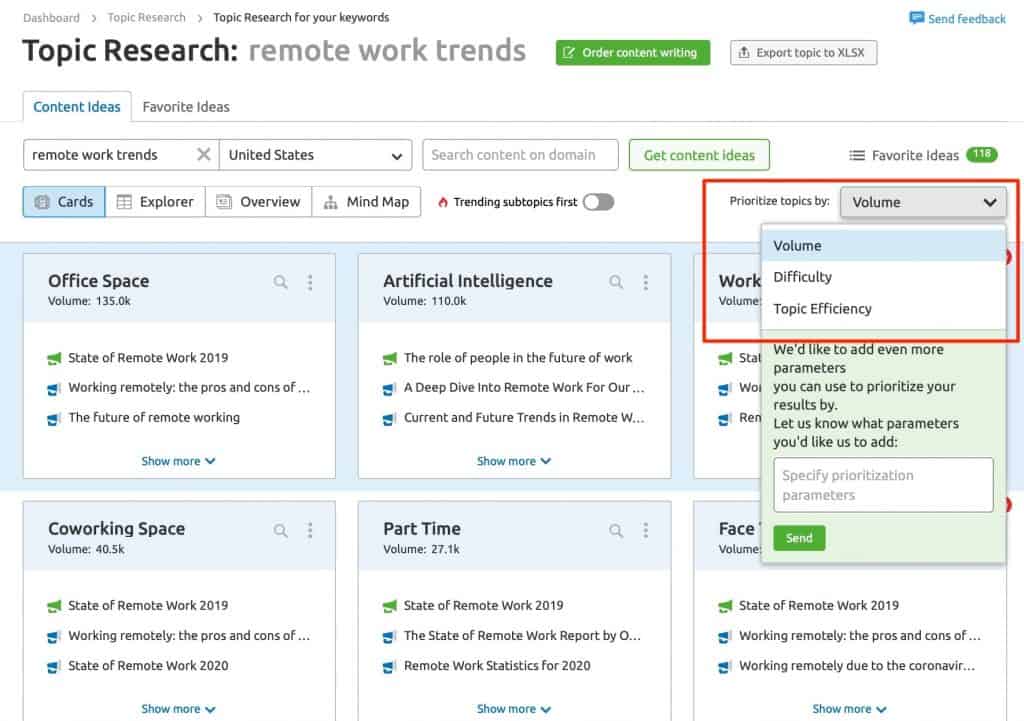
If you look at the right side, you’d see a filter there called Prioritize topics by. This basically sorts the results via volume, difficulty, topic efficiency.
- Volume means the topic’s monthly search volume, e.g. 110k
- Difficulty means how easy/hard it is to rank given the competition
- Topic efficiency combines the two metrics above to show you which ones will give you the highest ROI, i.e. highest traffic + lowest difficulty.
3. Card details
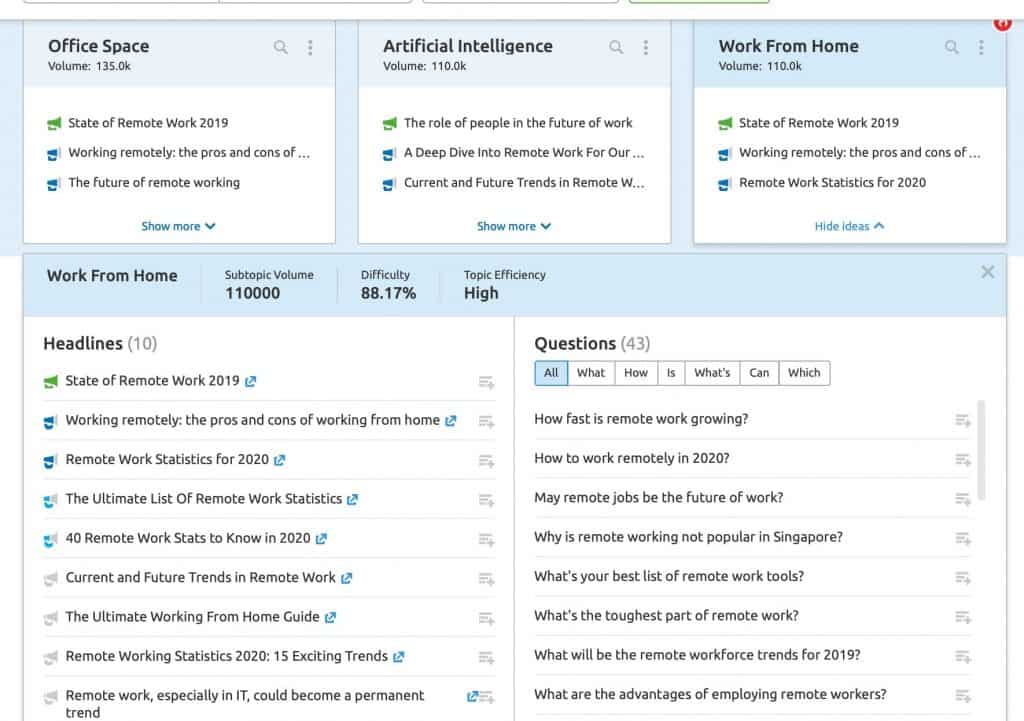
This is the main use of the Topic Research tool. When you click on any particular subtopic, you’ll see something that looks like the image above. There are 3 main parts:
- At the top, you’ll see the metrics for volume, difficulty, and efficiency.
- On the left column, you’ll see the headlines of the top 10 articles ranking on Google for the subtopic
- Then on the right, you’ll see a breakdown of questions related to it
SEO Content Template: How to Create SEO-Friendly Content
The SEO Content Template is a tool that helps content writers create content that has a high likelihood of performing well on search engines.
Familiar with the Skyscraper Technique? This tool helps you achieve that easily.
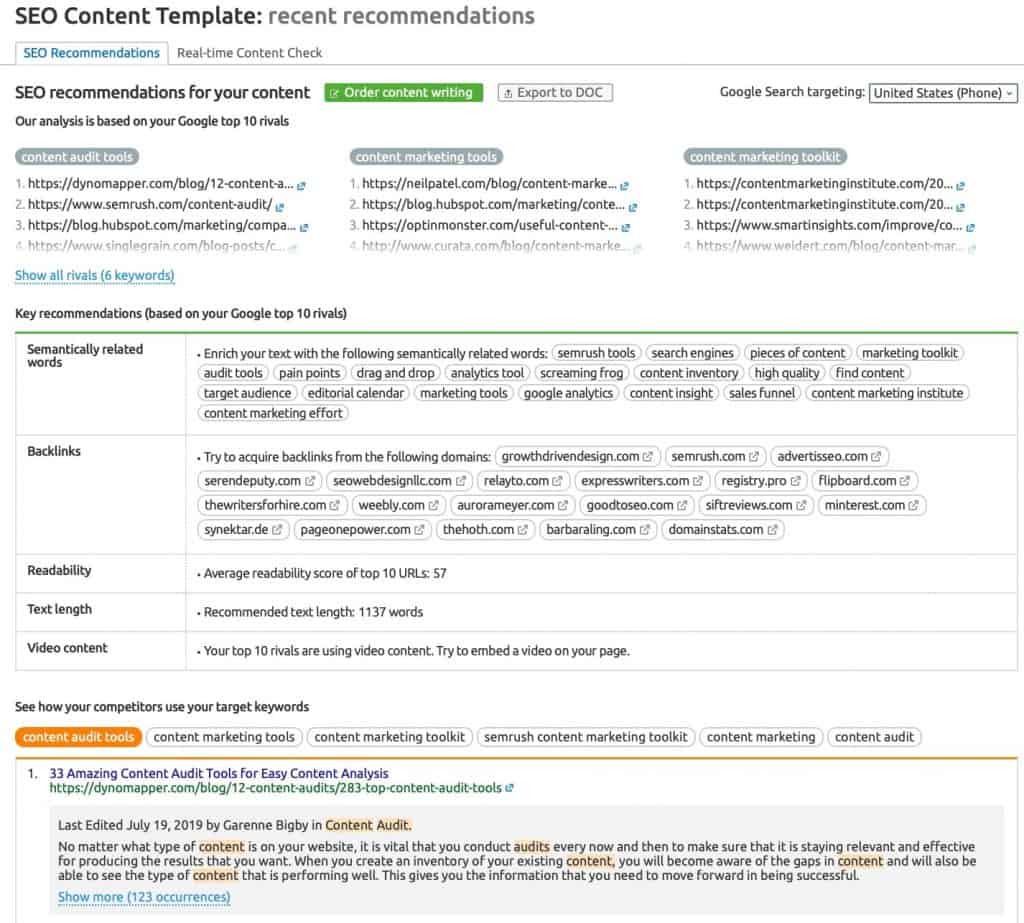
Just type in the main keyword/topic you want to rank for to get started. It will analyze the top 10 articles ranking on Google and give you recommendations on various aspects:
- What semantically-related keywords you should use throughout your content
- What sites you should try acquiring a backlink from
- Suggested readability score
- Recommended article length/word count
- Other recommendations like using videos
The screenshot above is a sample SEO Content Template in full.
From the top, you’ll find the following:
- Show you Google top 10 rivals per keyword
- Key recommendations based on your competitors in the following:
- Semantically-related keywords
- Websites to try to acquire backlinks from
- Readability score
- Text length
- Other recommendations like adding a video
- How competitors are using the target keyword in their content
- Basic recommendations you should use for your on-page SEO
- Page title
- Meta description
- H1
- Text/copy
The goal of this tool is to help you outrank your rivals on SERPS. The more you know about your current competition, the better you’ll be able to plan future blog posts and other types of content.
SEO Content Writing Assistant
SEMRush’s SEO Content Writing (SWA) is a companion to the SEO Content Template. It allows you to check the SEO potential and originality of a piece of content in real-time.
In other words, if the SEO Content Template provides you recommendations on keyword usage, readability score, and text length; SWA makes sure you meet those recommendations.
You can use the SEM Writing Assistant in 3 ways:
1. Use SWA in SEMRush
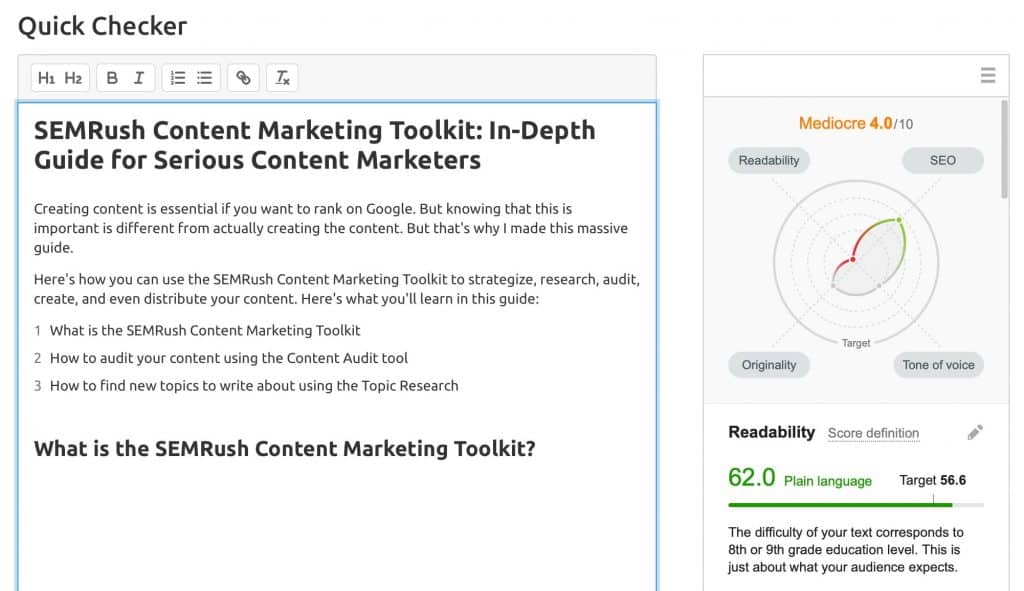
You can use the Writing Assistant within SEMRush directly. My experience, however, is not that great. It has limited functionality but handy if you need to quickly make one.
2. Use SWA in WordPress
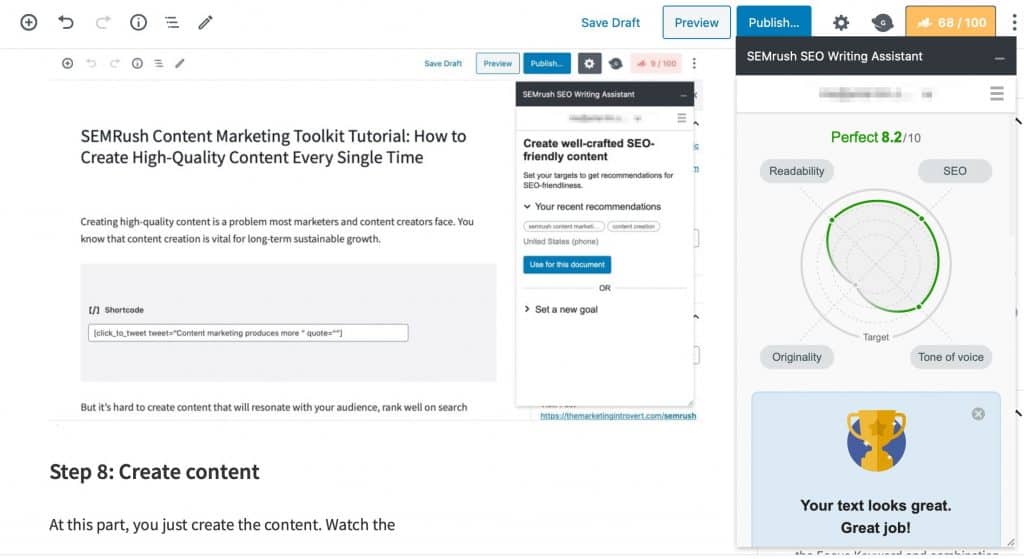
The SEO Writing Assistant is a plugin that you can add inside WordPress. Don’t worry, it only runs on the backend so it won’t have any negative effect on your site speed.
The default view for SWA is it’s at the bottom of your editor, so what I do is click on the float mode so it can appear as a sidebar.
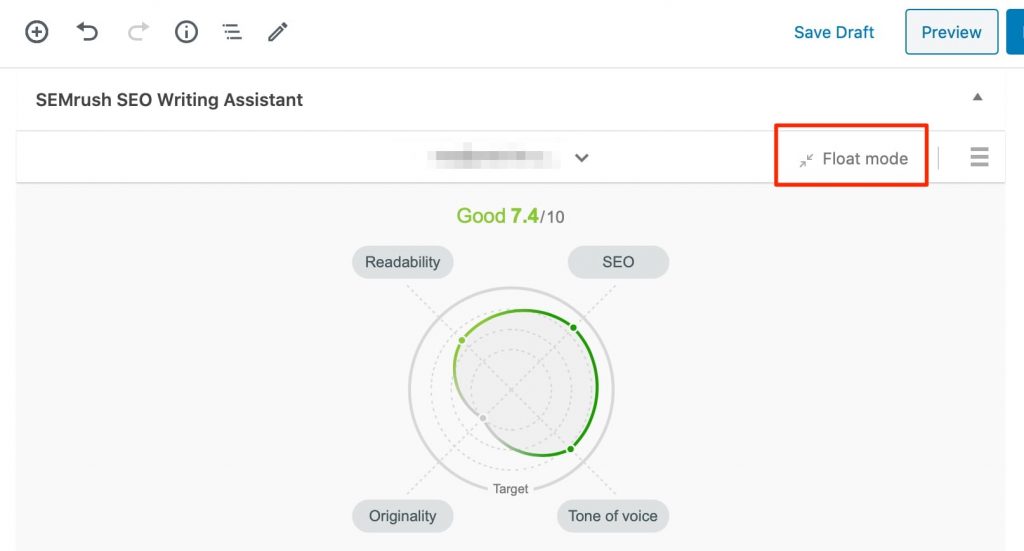
Once you do that, it will show up as a floating side bar.
If you notice, it looks similar to the one inside SEMRush. You’ll see your score on four fronts: readability, SEO, tone of voice, and originality.
This is my preferred method of using the SEO Writing Assistant.
3. Use SWA in Google Docs
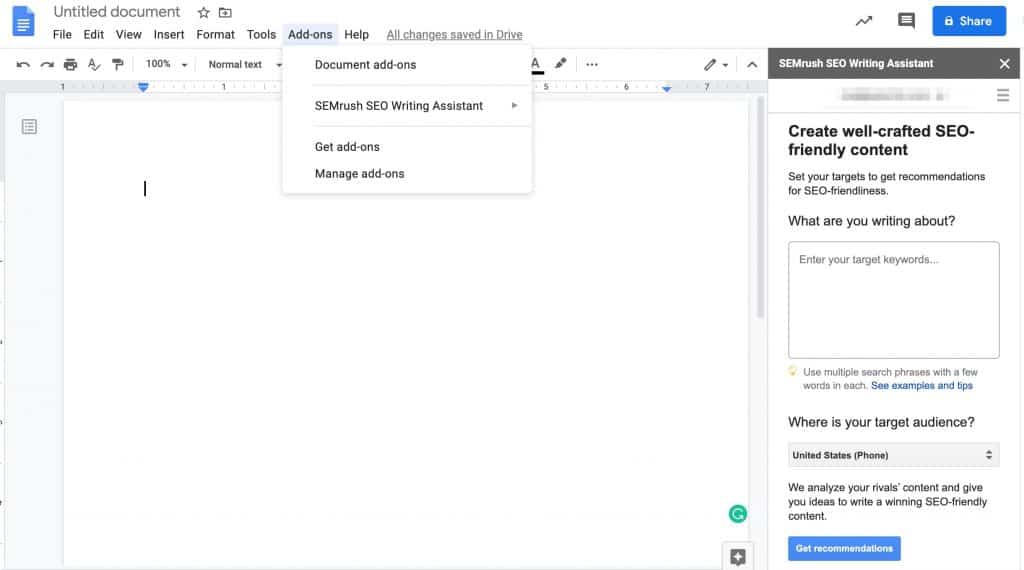
Finally, if you are a fan of Google Docs, you can just install the add-on, sign-in your SEMRush account, and the SWA can show you recommendations here.
This is perfect for this writing for other clients and/or working with other writers.
If you’re a paid SEMRush user, you can easily scale your content by creating a bunch of SEO Content Template and then export them to Google Docs. All you have to do is install it as an add-on. Then, when you share the document with your writers, they can access the SWA once they signup for a free account.
What Makes the Content Marketing Toolkit Different from Other Tools
I’m not going to discuss the feature-by-feature comparison here. What I’ll do is list the key questions and SEMRush Content Marketing Toolkit’s main difference from other/content marketing tool out there.
How is the SEMRush Content Marketing Toolkit different from SEO tools like Ahrefs, Ubersuggest, and Moz?
The Content Marketing Toolkit is a suite of tools within the SEMRush software that is focused on helping you create content. Ahrefs, UberSuggest, Moz (and other tools) are mainly for keyword research and analyzing keywords/page traffic, backlinks. SEMRush has these tools as well in its SEO Toolkit.
What’s the difference between SEMRush Content Marketing Toolkit with Yoast or Rank Math?
The difference between them is that the Content Marketing Toolkit by SEMRush uses artificial intelligence to help you research and create and best possible content. Yoast, Rank Math and other SEO plugins only help you with optimizing your page for a particular keyword(s). It doesn’t give you recommendations based on the rivals on Google.
Does that mean I don’t have to use Yoast/Rank Math if I’m using the SEMRush Content Marketing Toolkit?
No. In fact, they do work together. You can use the SEO plugins to handle your title tags, meta descriptions, and other technical SEO recommendations. You can use the Content Marketing Toolkit for it (more specifically the SEO Writing Assistant) to help you write a post that has higher chances of beating your rivals on Google.
For example, here is SEMRush’s traffic analytics tool. Just enter a domain here (yours or your competitors) to find which keywords they are ranking for.
How to Use the Content Marketing Toolkit
There are many ways you can use the SEMRush Content Marketing Toolkit. It depends on a lot of factors like how in-depth you want your research to be, your writing workflow, and many more.
Here’s an example of how I used the toolkit to create this article.
Step 1: Get Ideas on Your Chosen Particular Topic Using Topic Research

You start with heading to the Topic Research tool.
Once you’re there, simply enter the topic you want to research about and the location. That way, Topic Research will show you more tailored recommendations.
If you used the tool before, you’ll also see the recent searches below.
Step 2: Browse Different Cards

If you noticed, I entered my main keyword for this in the Topic Research tool.
It shows me various subtopics. What I did was browse through these cards to get an idea of what I’m up against.
Step 3: Use the Different Views
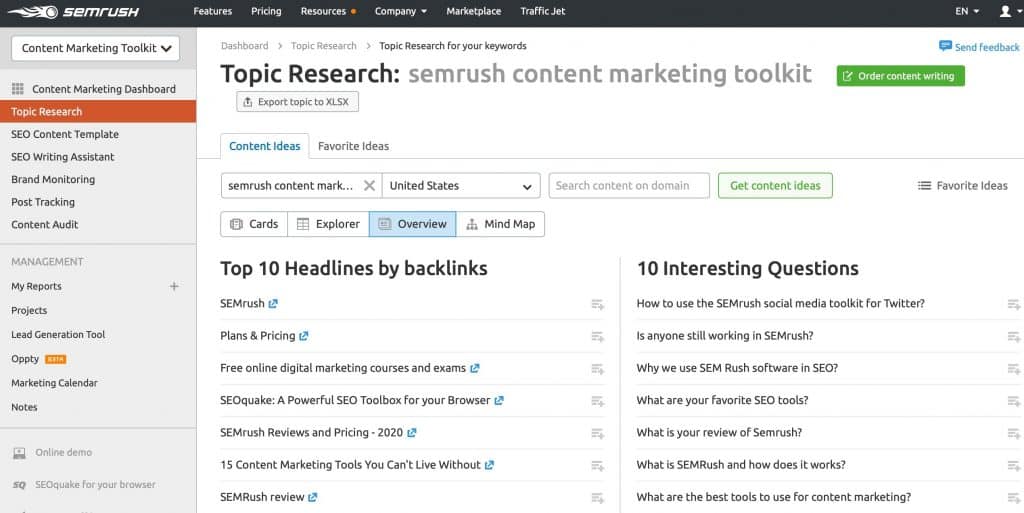
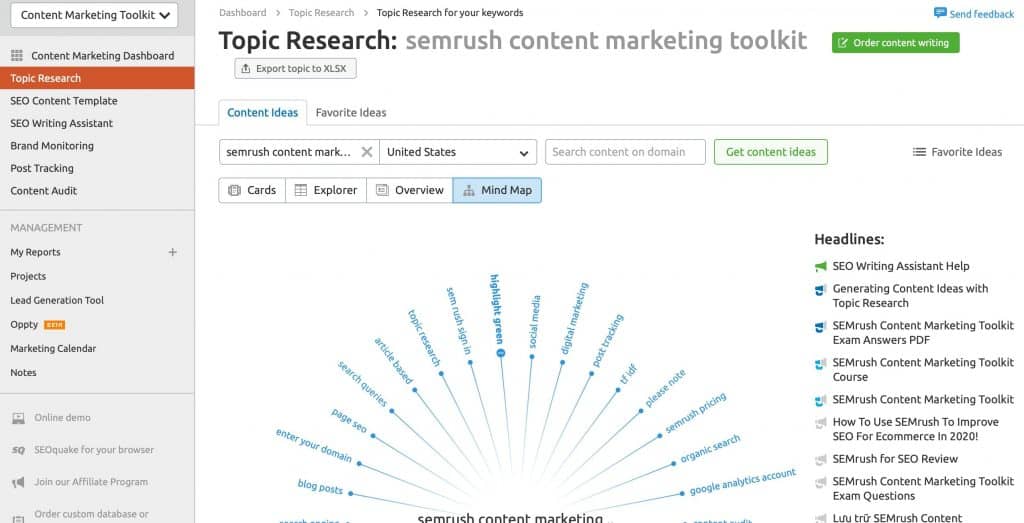
Sometimes, looking at things differently helps. The mind map is a particular example that might help trigger new ideas.
In my case, I browsed through all these views. If you’re particularly feeling lazy, head on over to the overview tab and base your research from that alone. Of course, I wouldn’t recommend this.
Step 4: Mark Your Favorite Ideas
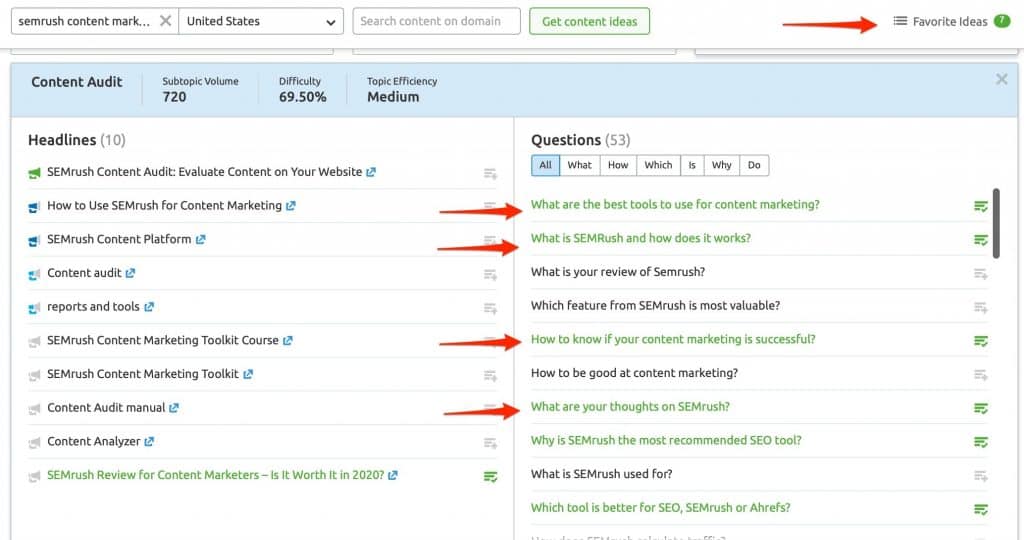
As mentioned above, headlines are the articles ranking on Google for that particular topic. Meaning, you can actually review these articles by clicking on the blue arrow to open the page on a new tab.
On the other side, you can toggle between the different questions.
If it’s something that resonates with you and you think will be helpful for your article, add it to your favorites. You do that by clicking on the icon to the right. Once you added the headline/question, the color will change to green.
You do this for every card, question, other related topics while doing your research. Again, it’s best to be thorough here that way you can create the best possible content to outrank your competitors.
Step 5: Look at Your Favorites List
After you finish your research, you will find the items you added to the favorites grouped into subtopics. Search for the ones that you want to write about. Then click on the button at the top to take you to the next step—SEO Content Template.
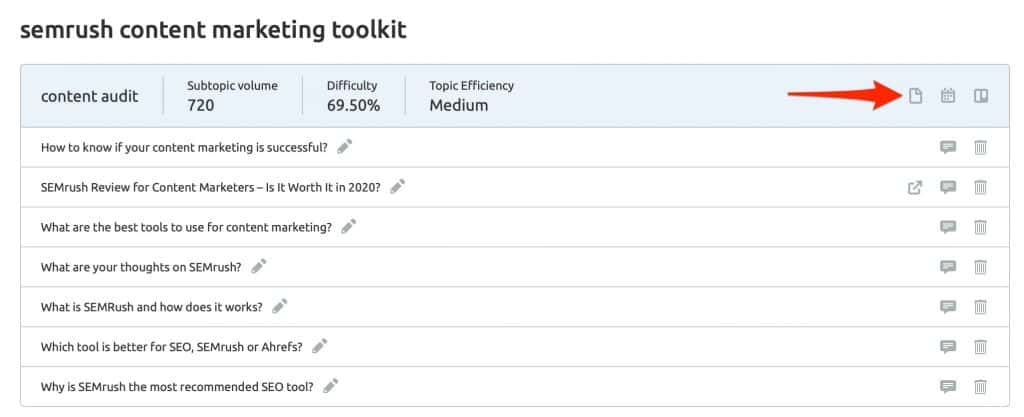
Step 6: Create an SEO Content Template
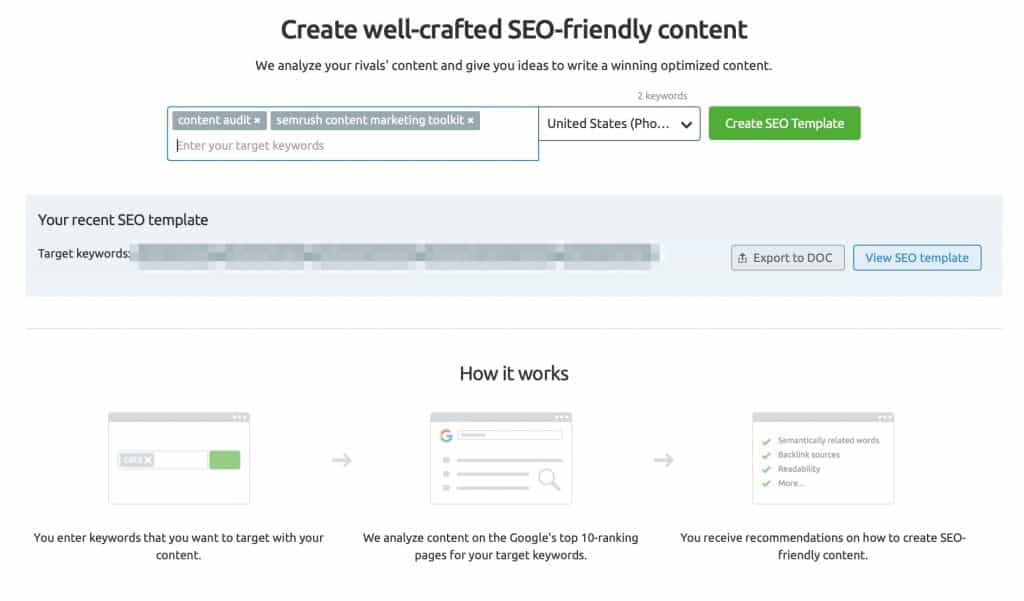
After clicking the button, you will be taken to the SEO Content Template creation page. It will automatically populate the keywords.
At this point, you can add/delete keywords here.
You can also choose the location and device targeting for recommendation. I strongly believe that mobile device users should be the priority, that’s why I am using it in all my targeting.
Once you’re happy, click on Create SEO Template.
Step 7: Connect SWA to SCT
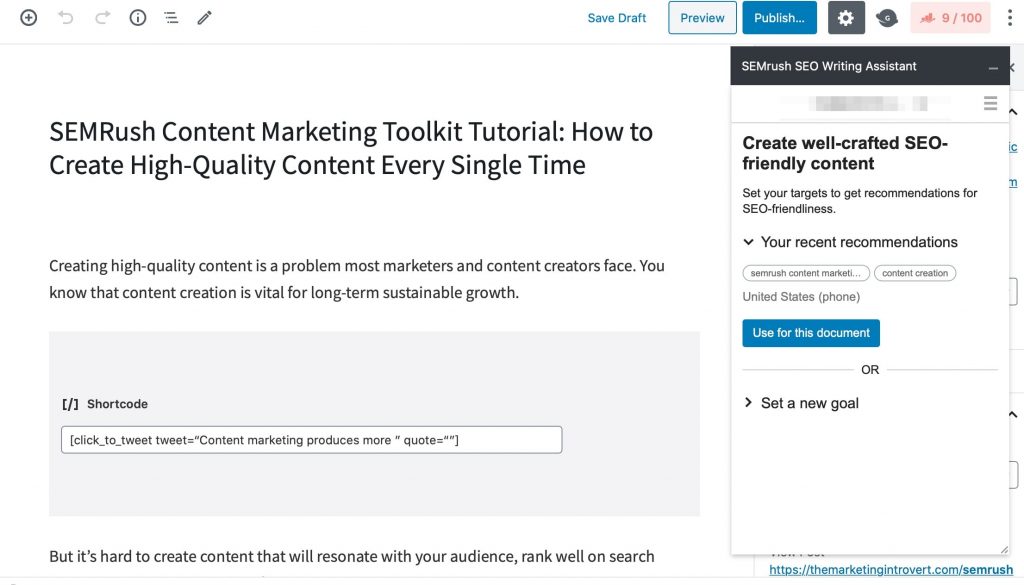
As you already know, I use WordPress.
I open up WordPress and create a new post.
I scroll down to find the SEMRush SEO Writing Assistant, click on float mode to bring the SWA to the sidebar, then add the Content Template I just created by clicking the Use for this document button.
This is important if you want to conserve your SEO Ideas Units. I’ll talk more about this limitations in the future.
Step 8: Create Your Content

This is the hardest part—writing your copy.
One tip I have for you is to use the headers you added to your favorites during the research process as your main sections and in your title tags.
Then, use the questions as subtopics that you answer inside your actual content.
For example, I answered a portion earlier about the difference between SEMRush Content Marketing Toolkit with other SEO tools because they appeared in the questions during research.
Step 9: Publish Your Content
Depending on your publishing frequency and timing, you either publish the post now or schedule it for later.
What I personally do is hit publish and worry about timing later on. I can always edit it later anyway.
Step 10: Distribute Your Content
After publishing, your task is not yet done.
You have to distribute your content in order for it to drive traffic and results to your business.
Here are 3 post-publish steps I do before anything else. It takes less than 15 minutes and has added an extra 7% in my organic traffic. Not bad at all.
After that post-publish workflow, I strongly recommend distributing it on all the channels you are already in like social media and email.
Then, here are other tactics you can do to help gain traction faster:
- Email the brand/website/author you mentioned or linked to in the article. This basically gives them a heads up saying you used their content, here’s the link, please promote it if you like it. Of course, you do it one by one. A simple “hey, we just published a new post and linked to your website. Here’s the link. Feel free to share it if you like it. Love your content. Have a great week ahead.” can go a long way.
- @ mention or tag every brand or website you mentioned or linked to on social media. This is the same tactic as above but you do it on another channel.
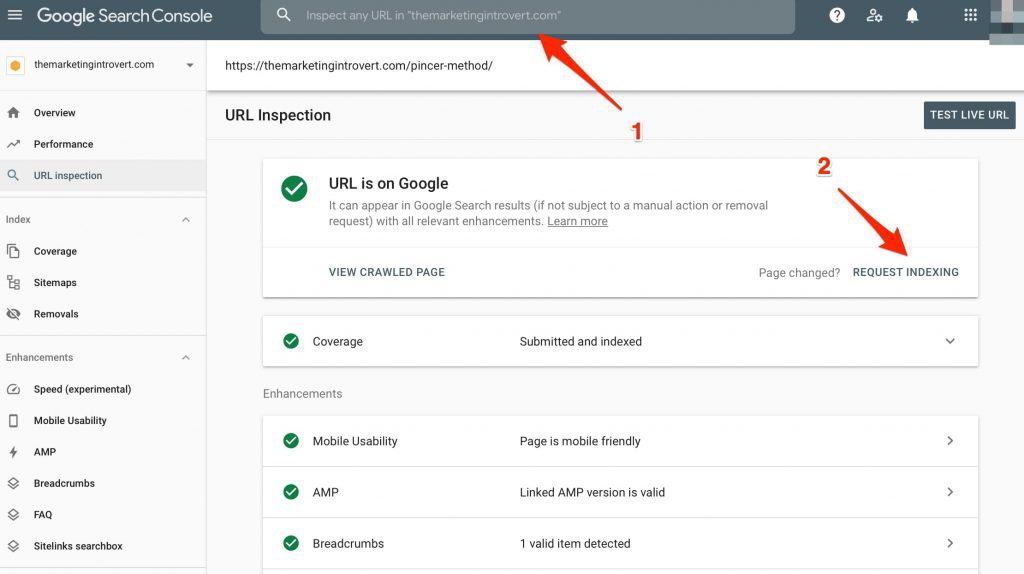
- Add your URL inside Google Search Console and ask for manual indexing. This will help your content get indexed by Google faster.
- Perform a site search on your domain for the main topic and add links from the existing content to the newly published one. For example, type this in Google without the quotes—”site:themarketingintrovert.com content marketing”. This will show you existing posts that mention the topic. Go through them and add a link to y our new post if it makes sense. This will help your new site get indexed faster, and also bring additional traffic since your existing, older posts will most likely have consistent traffic already.
Conclusion
The content creation process is hard work. It takes a lot of time and effort to craft the perfect piece. But with the right tools, you can speed up this process.
The SEMRush Content Marketing Toolkit helps you overcome content creation hurdles like researching topics that resonate with your audience, maintaining your brand voice, and making sure you are ranking for the keywords you’re targeting.
The Content Marketing Toolkit is available for all SEMRush users, both free and paid. Of course, there are limitations to each plan. Visit their pricing page to take a look and compare the plans. Below is an image that compares the key differences among the plans for the content marketing toolkit.
.png)
To get the most out of the Content Marketing Toolkit, the guru plan is the best choice. But, it does come with a price. You can try it here for free for 7 days.
If you notice the limits, you can only create one SEO template if you opted for a free or pro plan. If you want to create content that is well-researched and have a high chance of performing well on Google, choose the guru plan.
Then, follow the 10-step process I outlined here. But, instead of stopping there, what you can do is export everything all your SEO content templates to a word document so you can work on them after your trial.
If you have questions about how to use the SEMRush Content Marketing Toolkit, let me know in the comments below.
