Installing the Genesis Framework on WordPress is the first step towards having a website that Google loves. I’ve been very vocal about fast websites because it really is an opportunity a lot of websites are not taking advantage of.
If you don’t know this already, websites that rank on the top 5 slots on Google are 20% faster on average than those in the 6th position. As you go down the list, the website speed also goes down.
Using the Genesis Framework is one way to make sure your website speed doesn’t suck as the rest. Here’s everything you need to know to install the Genesis Framework on your WordPress website.
In the interest of transparency, this post may contain affiliate links to the tools mentioned. At no additional cost to you, if you click through and decide to purchase, I will earn a commission. Regardless, I only recommend products I use and believe will add value to you.
Basic Housekeeping (TL;DR)
If you haven’t already, I suggest reading more about the Genesis Framework and why it’s the best theme for your WordPress website. If you’re familiar with it already, here are a few things I want to highlight again:
- The Genesis Framework is a parent-child theme combination.
- Genesis Framework is the name of the main/parent theme. In order to use it, you need a child theme to go along with it.
- The child themes that work extremely well with the Genesis Framework are the ones from its developer, StudioPress.
- You can get these premium StudioPress themes in two ways
- Individually—the Genesis Framework is included
- Everything—35+ themes to choose from for one price
- You don’t need one of the StudioPress premium themes to use the Genesis Framework. It has a free child theme included with it. You’ll see this more in the example below.
Now that’s out of the way, the general steps you need to do in order to use the Genesis Framework on your website are as follows:
- Download the themes—both parent and child theme—from your StudioPress account (or WP Engine if you decided to go for the all-in-one package)
- Upload/install the theme
- Customize the theme
Let’ get started.
Step 1: Download the Genesis Framework—Parent and Child Theme
Before you can use the Genesis Framework, you need to have purchased it through StudioPress or WP Engine (as part of their web hosting + theme package).
You will then be given an account where you can download the theme files. Depending on what you purchased, you will be able to download the zip files of both the parent theme (Genesis Framework) and the child theme/s from StudioPress.
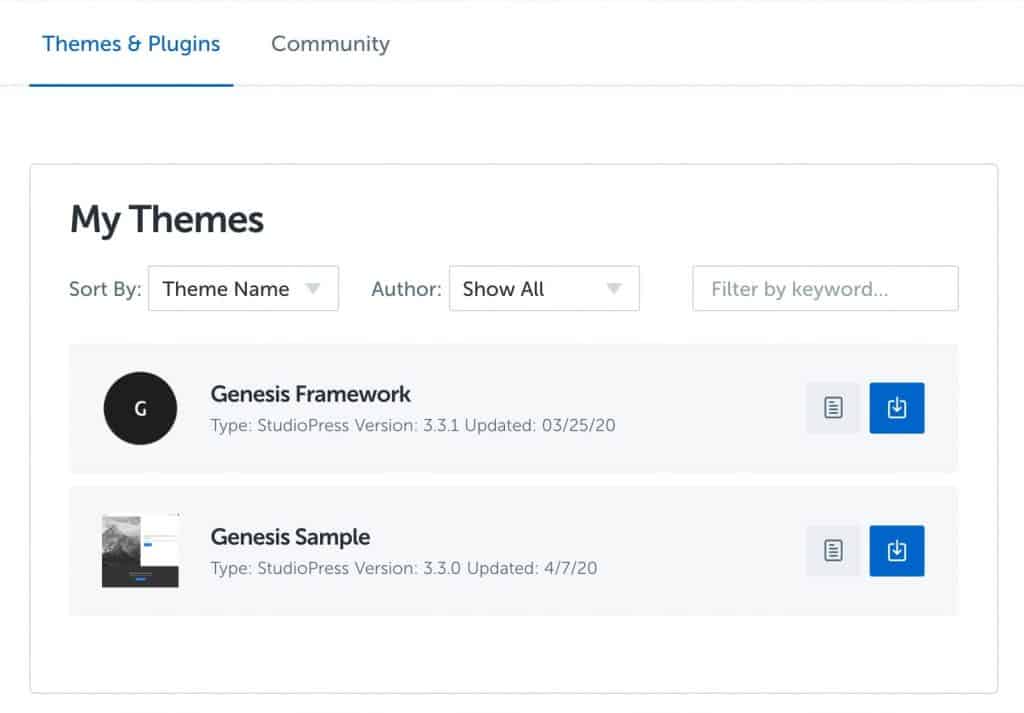
Like I mentioned earlier, you don’t need a StudioPress premium theme. Buying the Genesis Framework alone will come with its own child theme called the Genesis Sample. You can check this live demo to learn more. This website is running on this setup.
Once you downloaded the files, head on over to WordPress and login.
You will need to be an administrator in order to do this. If you’re doing this on your own, this won’t be a problem as the account you created is an admin account. But if not, you might have to request this from the owner of the site.
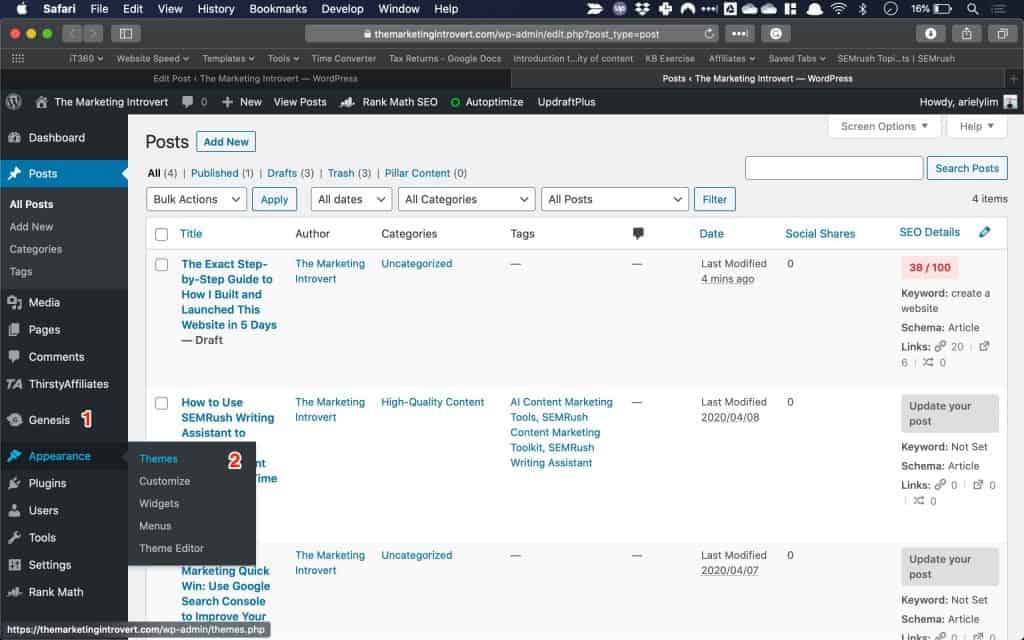
After logging in, hover your mouse on Appearance (1) then click on Themes (2).
Step 2: Upload the Themes
This is a two-step process.
You will upload the parent theme first followed by the child theme.
- The parent theme is the Genesis Framework.
- The child theme will be any one of the StudioPress themes you bought or decided to use.
In the example below, I’ll show you how to setup the Genesis Framework with the Sample child theme.
Upload the Parent Theme – Genesis Framework
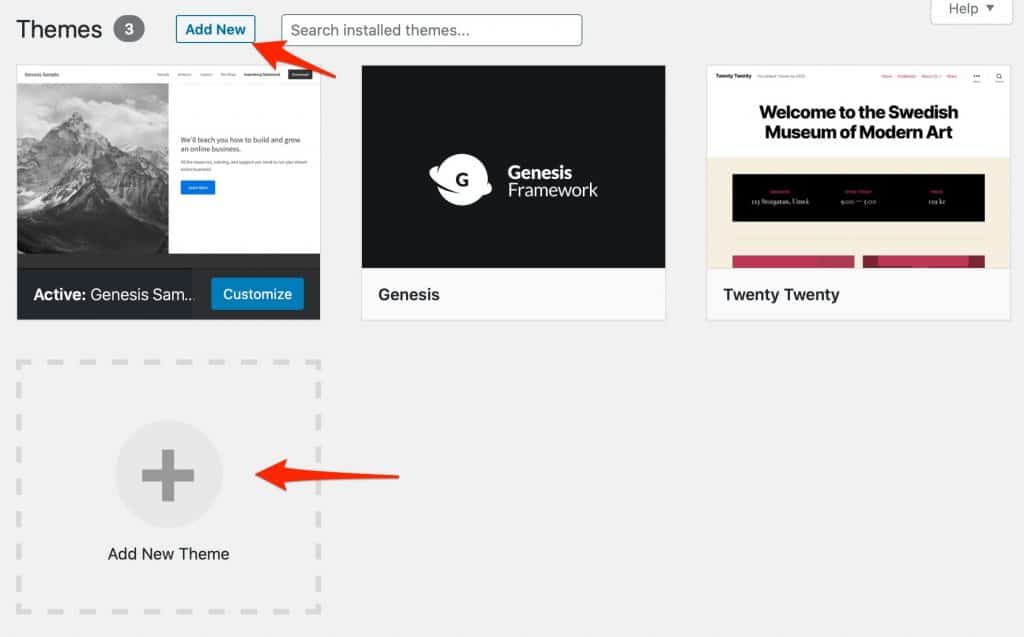
Click on Add New button and you will be prompted to upload a theme.
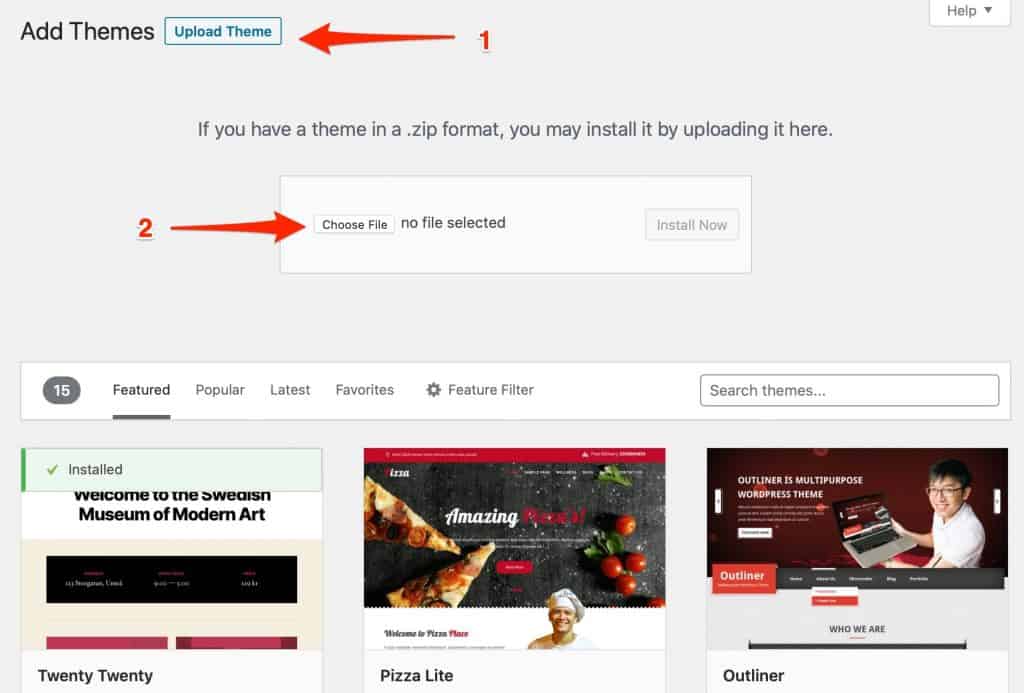
Click on Upload Theme then find the theme you just downloaded. Make sure you upload the Genesis Framework parent theme first.
In the image below, the filename genesis.3.2.1.zip is the parent theme. The other is the child theme.
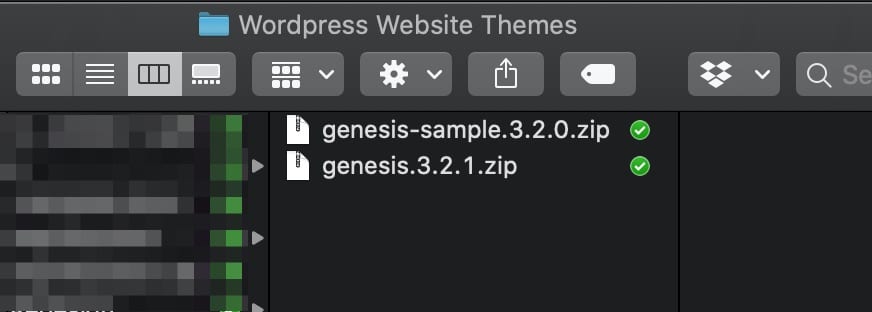
Depending on when you downloaded the files, the numbers will show differently. That’s the version number. You don’t have to concern yourself with this. Just make sure you install the parent theme in this step.
This is important: do not activate the parent theme.
Upload and Activate the Child Theme
After uploading the framework, it’s now time to upload the child theme.
Follow the same theme setup process above, but this time, choose the child theme to upload.
Once you’re done, click on activate on the child theme.
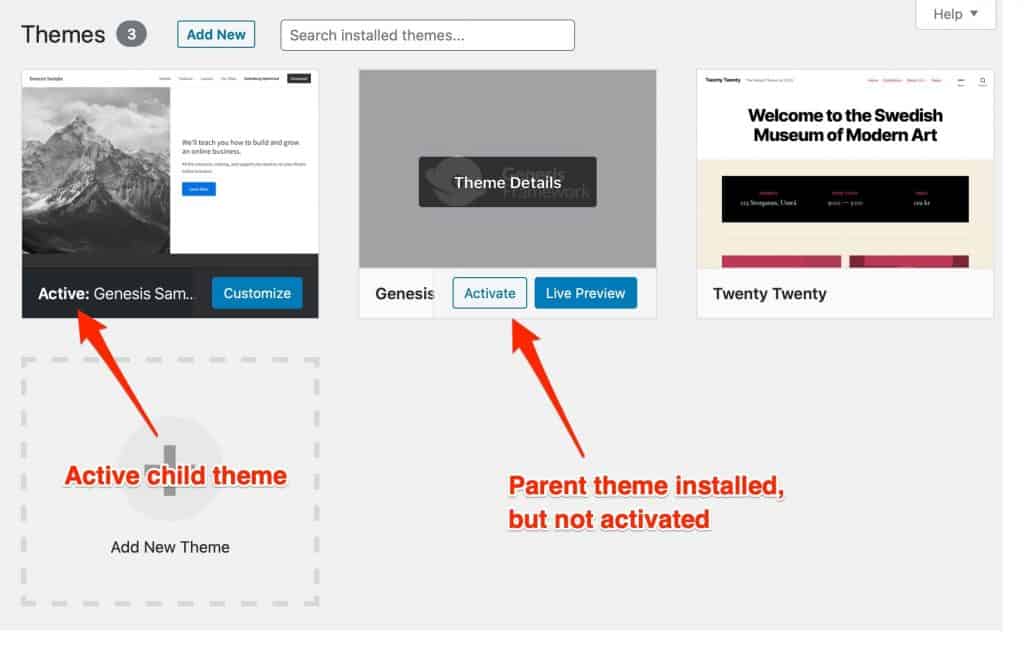
Then, you should have something that looks similar to the image above.
- The Genesis Framework is installed, but not activated
- The child theme (e.g. Genesis Sample) is installed and active.
Step 3: Customize the Child Theme
Depending on the StudioPress theme you chose, you might be prompted by one-click theme setup that allows you to automatically setup your website to resemble the demo.
If you missed this during the installation, you can click on Genesis from the left-hand menu, then Child Theme Setup.
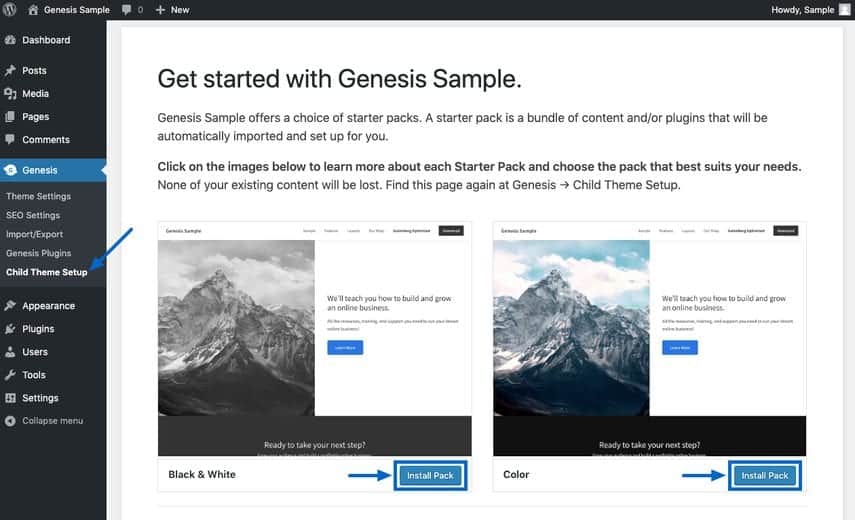
However, at the time of this writing, this is only available to the following themes.
- Authority Pro
- Essence Pro
- Genesis Sample
- Magazine Pro
- Monochrome Pro
- Navigation Pro
- Revolution Pro
What will happen is the plugins and other content (posts, pages, categories, tags, etc.) that you saw on the demo site will be added to your WordPress site.
None of your existing content will be overwritten, though. So that’s something you don’t need to worry about.
What makes this parent-child theme setup great is every time you update your theme (the Genesis Framework parent theme), your customizations will not go away.
This is the problem of a lot of regular WordPress themes. When you update the theme, all customizations get lost. That’s why most people rely on plugins because, that way, the changes they make to their website stay.
But relying on too many plugins slow down your site. So it’s best to stick with the basics.
Another way to copy the demo theme to your new website, with a catch
There is another way to install the demo theme on your brand new WordPress site. It’s to use the import function in WordPress to copy the files (pages, posts, tags, categories) from the demo theme.
Basically, you will be uploading an XML file to WordPress. Again, no need to worry about what all these mean. Just follow the steps below and you can do this on your own.
However, the plugins won’t be imported with it.
That means, it won’t look exactly the same as the demo theme.
You can use this option if you chose a theme that does not have a one-click setup that I described above.
First, locate the XML file you want to upload. Let’s say I want to copy the Breakthrough Pro theme. I find the zip file then unzip it. You’ll then find the XML file inside this folder.
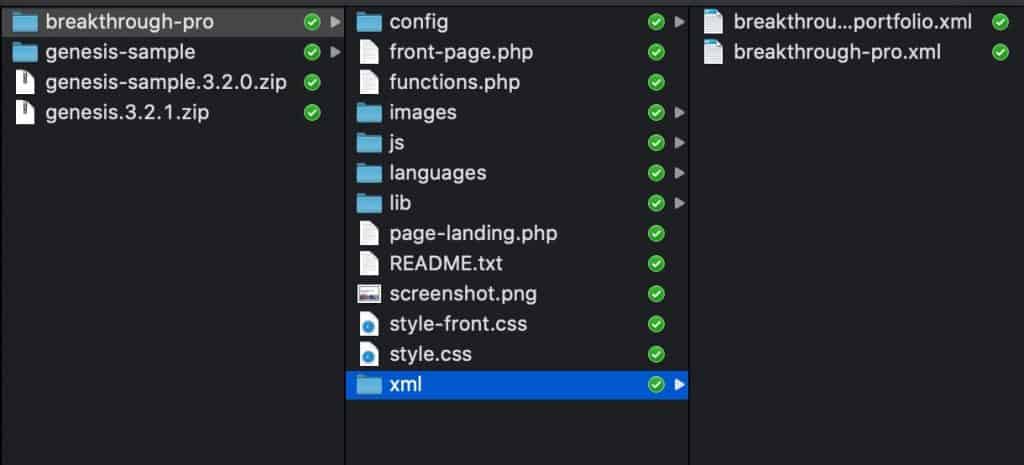
Now, here are the steps to import that to WordPress:
- Click on Tools
- Click Import
- Click Install Now under the WordPress header
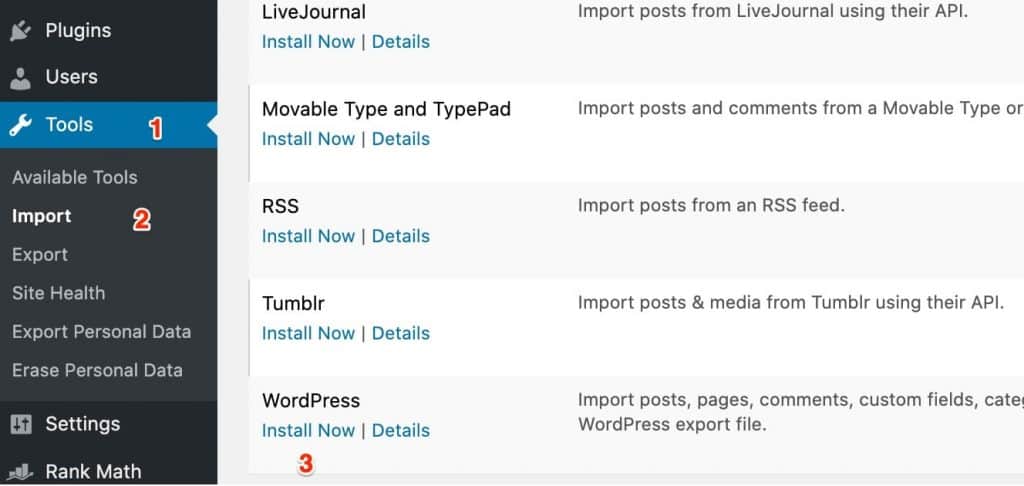
After that, the text will change to Run Importer. Click on that button and you’ll be asked to upload the xml file.

And there you have it. You just installed the best, SEO-optimized WordPress theme on your website.
Of course, it’s up to you to keep it that way.
Most website owners install plugins to increase functionality. There’s nothing wrong with that. This website uses a bunch of them.
But you have to be careful not to bloat up your site. Too many plugins can cause your website to load slower than it’s supposed to. A good target to keep in mind is a load speed of 2 seconds or less.
Remember, a website needs only these 4 things. Adding too much functionality to your site can cause more harm than good. Let me know if you encountered any issues when installing the Genesis Framework on your site.
After installing the Genesis Framework parent and child theme, the next step is to install Google Tag Manager. This allows you to manage all your tracking codes (like Google Analytics) and other future software you may want to use on your site.
List of non-affiliated links used in this post:
